Well I have gone to my home town to be with all my family. And would like to wish all of you a very Merry Christmas and Happy Holiday.
See you after the New Year..........Blessings
Therese

Thursday, December 23, 2010
Saturday, December 18, 2010
IN LOVING MEMORY OF MY PRECIOUS NEPHEW
I wanted to make a special ornament for my precious nephew Jeph who went to be with the Lord last year and give it to my sister and her family. I made a simple one last year and my sister said when she went to put it away after Christmas it broke and she was devastated. So this year I had a chance to make a nicer one...Jeph loved argyle and plaid so that is the papers I chose. Also I got this very nice ornament box at our favorite (Hby Lby) to keep it safe and of course a card to go with the ornament.


I love and miss you nephew. You are forever in my heart


Christmas Tags
I don't know about you......but I'm so full of glitter and glue I look like an ornament myself! Every year I make a gift tag that's a ornament for the next year and this is my favorite this year. This one is for my 10th great nephew Landyn who is almost 4 mo and his 1st Christmas.
 |
| This is from the Snow Angles cartridge I cut the coat at 5" and the mittens at 2". Glossy accents on the buttons and flocking on the lapel and pockets. I think this is just fun!! |
 |
| Wrapping paper always gives me inspiration as to what tag to make. Embossing the snowman a few pears for eyes and buttons and s ribbon for the scarf. For the life of me I cannot find the cartridge I got this snowman from and have looked 3 times...maybe I'm getting a little worn out, hehe |
Wednesday, December 15, 2010
SnowFlake Broach


Sunday, December 12, 2010
OH... Cinnamon Stix !
This is a project I use to make out of cinnamon sticks when my kids were young and thought I would bring it back again. They can be used many ways......on a Christmas package, make an ornament out of them, attach them to a place card, put them in a flower arrangement etc.

 |
| You can purchase the cinnamon sticks at any hobby store. I break them in half and get more pieces that way. I just take some acrylic paint and paint the top part all white for snowman and flesh colored for Santa. I then take my markers and and make little faces, for the snowman that is all I do, but Santa needs a little more paint of white for his beard and mustache and fur on his hat then some red paint for the hat and when its dry you can add some glitter. I love the glimmer mist .....when they are dry they get a very light coat ( I just spray it in the air and let it fall on the sticks so the paint does not run all over). I like to add a little green garland around their necks and a jingle bell (kids love that part) ....all which I purchase at a hobby store in the make it miniature Christmas section. Hope you enjoy them. |

Friday, December 10, 2010
Cookin up some Christmas
I was getting this project ready for the Cricut weekly challenge......but I was a day late so I will just share it with you for fun!
I found some recipe boxes at (Michaels) for $1 and just went and refurbished them with some papers from K&Company. On this box I roughed it up with sandpaper and antiqued it with Tim Holtz inking pads adding some simple embellishments and you have a pretty little Recipe box for a gift perhaps for yourself.
 Spritz Cookies
1C Shortening
3/4 C Sugar
1 Egg
1tsp Lemon extract
2 1/4 C Flour (sifted)
1/4 tsp Salt
1/2 tsp Baking powder
 Spritz Frosting
1/4 C Butter (softened)
2 C Powdered sugar
1 tsp Almond extract
3 Tlbs Heavy cream
Mix together and add coloring if desired
I put mine into a pastry bag and use a leaf tip or tip #70 and then I sprinkle with Wiltons edible glitter


I found some recipe boxes at (Michaels) for $1 and just went and refurbished them with some papers from K&Company. On this box I roughed it up with sandpaper and antiqued it with Tim Holtz inking pads adding some simple embellishments and you have a pretty little Recipe box for a gift perhaps for yourself.
- The recipe card is from Kate's Kitchen cartridge ( to make them fit a recipe box set the inches to 4.3) then I added the sleigh ride cut from Christmas cards seasonal cartridge, using Tim Holtz ink dyes to color the image. Now for my favorite cookie of all times is a Spritz cookie (made with a cookie press) I'm including the recipe for all of you to enjoy.

1C Shortening
3/4 C Sugar
1 Egg
1tsp Lemon extract
2 1/4 C Flour (sifted)
1/4 tsp Salt
1/2 tsp Baking powder
- Cream shortening till soft
- Add sugar till light and fluffy
- Add egg, lemon extract and beat
- Mix flour, salt and baking powder together in a bowl then add it to batter in 3 segments, beat well each time.
- Chill sough 10 min
- Pack into cookie gun
- Bake at 400 degrees for 8 to 10 minutes
- Frost

1/4 C Butter (softened)
2 C Powdered sugar
1 tsp Almond extract
3 Tlbs Heavy cream
Mix together and add coloring if desired
I put mine into a pastry bag and use a leaf tip or tip #70 and then I sprinkle with Wiltons edible glitter


 |
| This recipe box is covered with papers from Cricut Imagines Kate's Kitchen |

 |
| Here is just another fun project from Kate's Kitchen cartridge that would also make a fun gift. You print this on one sheet of paper and their is extra recipe cards to print as well. Sometimes they do not come out the right size so I played with it and to match the same size as the cover you want to set your inches at 8.5 |

Sunday, December 5, 2010
A SPECIAL THANK YOU !
Not long ago I started this blog to enter a cricut circle contest for fun and low and behold came to meet some wonderful new ladies. But I want to say a special Thank You to Nadia.....With Glittering Eyes who has been such a supporter of my work. Nadia is so incredibly creative and talented and a total inspiration to me. She always has a kind word to say about others and is a wonderful promoter of others creativity.
So now I would like to say Thank You to Nadia. And don't forget to check out her blog and see all the wonderful projects she has to offer.
So now I would like to say Thank You to Nadia. And don't forget to check out her blog and see all the wonderful projects she has to offer.
Monday, November 29, 2010
THE MOST WONDERFUL TIME OF THE YEAR
My 1st Christmas card of the season. It is all made from the Sentimental cartridge and the papers are from KandCompany and the cream paper is DCWV shimmer papers (big fan of these) I then put a splash of tinsel glitter (Martha Stewart) and an elegant stamp, the ribbon is also (MS) seam binding ribbon.Finished the inside with another stamp and you have what I think is a pretty little card. 


WALKIN IN A WINTER WONDERLAND
One of my favorite parts of Christmas is putting up my village. So I thought I would share it with you and take you to my little world of Christmas splendor. I put it on Styrofoam panels and then scored the Styrofoam with a craft knife to look like cobble stone and then painted it, added a lake with accent glaze over it to give it the appearance of water, a little snow and there ya have it. Hope you enjoy your walk. 


Monday, November 22, 2010
HAPPY THANKSGIVING
I realize this is a few days early but I want to wish each of you a Happy Thanksgiving. I am going to my home town to spend a few days with my family and cannot wait to play with my granddaughters I have not seen in a month.
I hope each of you have a wonderful time with your family or friends and safe travels for those leaving home.
Thank you for spending a few moments of your time with me.
Be Blessed,
Therese (aka Sugar Pea)
I hope each of you have a wonderful time with your family or friends and safe travels for those leaving home.
Thank you for spending a few moments of your time with me.
Be Blessed,
Therese (aka Sugar Pea)
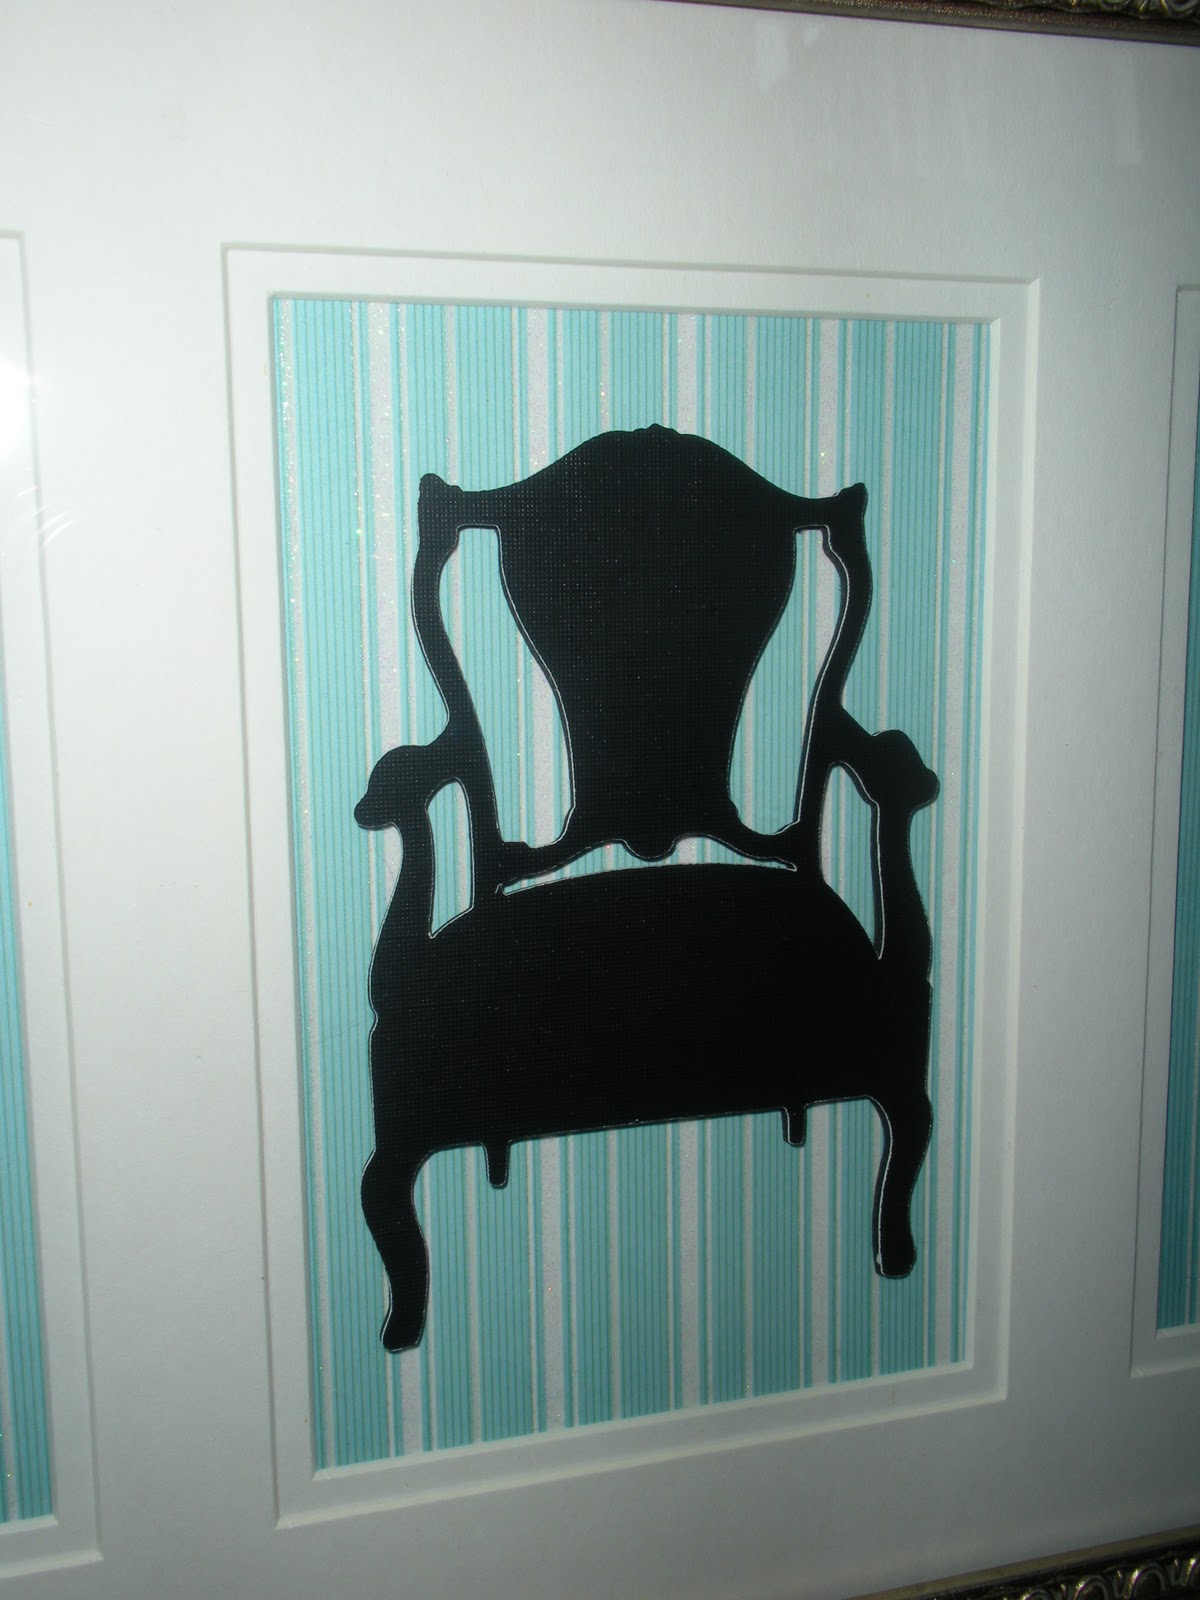
This is just a very simple project I did that can be used as a lovely gift for someone you know. Chairs, Chandelier's, Birds and Bird cages are the rage right now, so you pretty much can't go wrong with them. Maybe your expecting an earth shaking project from me, and if so I apologize, with my work schedule right now it is just impossible for me to get anything done.
But sometimes the simple things are just as welcoming as those 20 hr projects. A simple yet elegant frame with mates already in them make this especially easy, choosing a background paper to match a decor and the cuts of these chairs are from Sentimental and French Manor cartridges. I cut them at about 4in each with 2 cuts per chair and some pop dots and viola you have a very pretty gift. Maybe do a series of frames to include all chandelier's and one with couches or all bird cages. I think most ladies would be pleased to get a gift like this for Christmas. They sell them in the stores for a pretty penny, but ours are personalized and made from the heart.
But sometimes the simple things are just as welcoming as those 20 hr projects. A simple yet elegant frame with mates already in them make this especially easy, choosing a background paper to match a decor and the cuts of these chairs are from Sentimental and French Manor cartridges. I cut them at about 4in each with 2 cuts per chair and some pop dots and viola you have a very pretty gift. Maybe do a series of frames to include all chandelier's and one with couches or all bird cages. I think most ladies would be pleased to get a gift like this for Christmas. They sell them in the stores for a pretty penny, but ours are personalized and made from the heart.


Friday, November 19, 2010
Under Construction
Hi Everyone,
Well I found this really beautiful limited edition background by Bunny Kouba at Shabby Lanes shops. We are trying to tweek it to fit just right. Also hope to have some project up on the blog, it's just been a busy time with work and the holiday's coming up. Hope all is well with all of you and that you have a Blessed day.
Thanks for your patience,
Therese
Wednesday, November 10, 2010
Magazine Ornament Challenge


 |
So this is my Christmas ornament for the challenge. I had a blast making this one. I found this really cool ornament at Hobby Lobby, it's called a" photo ball ornament". It opens from the bottom so you can put a photo in it. So I decided to use the Snow Angles cartridge. So here we go |
 |
The little girl in the sleigh, I have cut 3 different layers so there is a lot of dimension. The background is one of the snowflakes cut at 2.9 in on the cricut imagine (fits perfect in the ornament). I embellished the sleigh with glitter and the glossy liquid for even more dimension, added pearls and gems. I also used white flocking for the collar on her coat. This is done on both sides of the ornament. |
 |
| Detail is everything to me so I added a little snow in the ornament for extra fun. To finish the piece and keep with the rules of the challenge I took the velvet ribbon and embossed it with the cuttlebug and wrapped it around the seam of the ornament. I took these crystals off another ornament attached it to the ribbon and attached the top back on. Decorated the top of the ornament with crystals and found some fun Christmas hangers to hang it with, and added some shinny holly leaves I found in the Christmas section at the Hobby store. |


 |
| The backgrounds are also from the Snow Angle cartridge and I put a shimmer mist on all the pieces for that glittery holiday feeling. |
 |
| This is just another ornament I made for fun (it's not for the challenge however). It is also from the Snow Angle cartridge. I flocked the birds and the top of the stocking and just embellished it with glitter glues. This also has 3 layers. |


 |
| These next couple pictures are and ornament I made from the K@Company Brenda Walton paper ornament kit.I really enjoy this kit all you have to do is put them together and embellish them the way you like and you have a lovely Christmas ornament. I also put that fun Shimmer spray on this too. |
 |
| This is the back side of this ornament |

Subscribe to:
Posts (Atom)